Introduction: The Timeless Allure of Banana Pudding with Vanilla Wafers Recipe
Banana Pudding with Vanilla Wafers Recipe with vanilla wafers is more than just a dessert; it’s a beloved classic that evokes a sense of nostalgia and comfort for many. This layered delight, with its creamy custard, fresh banana slices, and soft-yet-slightly-crunchy vanilla wafers, has become a staple at family gatherings, potlucks, and holiday celebrations. Its roots trace back to Southern cuisine, but its appeal has spread far beyond, becoming a cherished dish across America and beyond.
The magic of banana pudding lies in its simplicity and the harmony of textures and flavors. Each bite offers a perfect balance of sweet, creamy, and fruity elements, interwoven with the subtle vanilla notes of the wafers. This dessert’s versatility adds to its charm; it can be made with homemade custard for a traditional touch or with instant pudding for a quick and easy treat. Its nostalgic presence in recipe books and kitchens over generations cements its status as a culinary icon.
Whether served in elegant parfait glasses or scooped generously from a family-style dish, banana pudding with vanilla wafers is more than a dessert—it’s a cherished memory waiting to be relived with every spoonful.
Why Banana Pudding with Vanilla Wafers Recipe is a Timeless Classic
The History of Banana Pudding
Banana pudding’s journey to fame is as rich as its flavors. Its origins date back to the late 19th century when bananas were first introduced as an accessible fruit in America. Influenced by English trifles, early banana pudding recipes often featured layers of custard, sponge cake, and bananas. However, the addition of vanilla wafers, first introduced by Nabisco in the 1920s, transformed the dish into the iconic dessert we know today. By the mid-20th century, banana pudding had firmly rooted itself in Southern cuisine, appearing in church cookbooks and community gatherings as a symbol of home-style cooking and comfort.
Why Vanilla Wafers Make It Special
The inclusion of vanilla wafers is what sets banana pudding apart from similar desserts. These golden, slightly crisp cookies bring a subtle sweetness and a touch of vanilla flavor that perfectly complements the creamy pudding and ripe bananas. Over time, as the pudding sets, the wafers soften, creating a delightful textural contrast. Their role is not just functional but nostalgic, as many fondly remember sneaking a wafer or two from the box while preparing the dessert. The pairing of vanilla wafers with banana pudding has become so iconic that it feels incomplete without them.
Regional Variations of the Recipe
While the classic banana pudding recipe is beloved nationwide, regional adaptations showcase its versatility:
- Southern-Style Banana Pudding: Often made with a homemade custard and meringue topping, this version emphasizes the art of scratch cooking and traditional flavors.
- Quick and Easy Variants: Popular in the Midwest and beyond, these recipes utilize instant pudding mixes and whipped topping for a convenient yet delicious option.
- Layered Parfaits: In urban and contemporary settings, banana pudding is often served in individual glasses, layered artistically for a modern twist.
- Texan Banana Pudding: In some Texas households, the dessert is given a smoky flair by incorporating caramelized bananas or a sprinkle of cinnamon.
Ingredients You’ll Need for Banana Pudding with Vanilla Wafers
Bananas: Choosing Ripe but Firm Bananas
The key to a perfect banana pudding lies in selecting the right bananas. Opt for ripe bananas with yellow skins and a few brown speckles. These are sweet and flavorful without being overly soft, ensuring they hold their shape in the pudding. Avoid bananas that are too green (which can taste bitter) or overly ripe (which may become mushy and overpower the dessert).
Vanilla Wafers: Store-Bought or Homemade?
Vanilla wafers are an essential component of banana pudding, and you have options depending on your time and preferences:
- Store-Bought Wafers: Nabisco’s classic Nilla Wafers are the gold standard for many, offering convenience and the familiar taste most people associate with this dessert.
- Homemade Wafers: For a personal touch, you can bake your own vanilla wafers. Homemade wafers often have a richer vanilla flavor and a slightly different texture, adding a unique twist to the dish.
Pudding Mix vs. Homemade Pudding
The foundation of banana pudding can be either a pudding mix or a homemade custard, depending on your desired level of effort and flavor preference:
- Pudding Mix: Instant or cook-and-serve pudding mixes are a time-saving option. Vanilla or banana-flavored pudding mixes work best, providing consistent results with minimal effort.
- Homemade Pudding: A homemade custard, made with milk, eggs, sugar, and vanilla extract, elevates the dessert to a new level. The richness and depth of flavor from scratch-made pudding make it well worth the extra effort for special occasions.
Additional Ingredients
To complete your banana pudding masterpiece, you’ll need the following:
- Milk: Essential for preparing both instant pudding mixes and homemade custard. Whole milk is ideal for a creamier texture.
- Eggs: Used in homemade custard for thickening and richness.
- Sugar: Adds sweetness to homemade pudding and balances the banana flavor.
- Vanilla Extract: Enhances the overall flavor and complements the vanilla wafers.
- Whipped Cream: Optional but highly recommended for topping. You can use store-bought whipped topping or whip heavy cream with a touch of sugar and vanilla for a luxurious finish.
Tools and Banana Pudding with Vanilla Wafers Recipe
Mixing Bowls and Whisk
A set of mixing bowls is essential for preparing the pudding and whipping any cream. You’ll need:
- Large Mixing Bowl: For combining pudding ingredients or preparing instant pudding.
- Medium-Sized Bowl: Useful for whipping cream or mixing smaller components like custard.
- Whisk: An indispensable tool for ensuring a smooth and lump-free pudding or custard. A sturdy whisk will help blend ingredients efficiently, giving the pudding a velvety texture.
Baking Dish or Trifle Bowl for Layering
The choice of dish can influence both the presentation and practicality of serving:
- Baking Dish: A standard rectangular or square glass baking dish is perfect for family-style servings. The clear sides let you see the beautiful layers of pudding, bananas, and wafers.
- Trifle Bowl: For an elegant touch, consider using a tall, clear trifle bowl. The layered dessert looks stunning and is perfect for special occasions or gatherings.
Optional Tools for Enhanced Presentation
For those who want to elevate the visual appeal of their banana pudding, these optional tools come in handy:
- Stand Mixer: A stand mixer makes quick work of whipping cream to stiff peaks, saving time and effort compared to using a handheld whisk. It’s also useful if you’re preparing a homemade custard that requires constant stirring.
- Piping Bag: If you’re feeling fancy, a piping bag with a decorative tip can be used to create swirls of whipped cream on top of the pudding. This adds a professional finish and makes the dessert even more inviting.
Step-by-Step Recipe for Banana Pudding with Vanilla Wafers Recipe
Step 1: Preparing the Pudding Base
Creating the pudding base is the foundation of a delicious banana pudding. Whether you’re opting for homemade pudding or an instant mix, this step determines the creamy texture and rich flavor of your dessert.
How to Make a Creamy Homemade Pudding
Homemade pudding requires a bit more effort but rewards you with unparalleled taste and texture. Here’s how:
- Ingredients: Gather whole milk, sugar, eggs, cornstarch, and vanilla extract.
- Combine Dry Ingredients: In a saucepan, whisk together sugar and cornstarch to prevent lumps.
- Add Wet Ingredients: Gradually whisk in milk and egg yolks until smooth.
- Cook the Pudding: Heat the mixture over medium heat, stirring constantly to prevent scorching. The pudding will thicken as it approaches a simmer. This typically takes about 8–10 minutes.
- Add Vanilla: Once thickened, remove from heat and stir in vanilla extract for flavor.
- Cool: Let the pudding cool slightly before layering, covering it with plastic wrap pressed directly onto the surface to prevent a skin from forming.
Tips for Using Instant Pudding Mix
If convenience is your priority, instant pudding mix is a quick and reliable option. Here’s how to make it shine:
- Choose the Right Flavor: Vanilla or banana-flavored pudding works best for this recipe.
- Measure Accurately: Follow the package instructions, typically requiring a mix of pudding powder and cold milk.
- Whisk Thoroughly: Use a whisk or electric mixer to blend the mixture for a smooth, lump-free consistency.
- Chill: Allow the pudding to set in the refrigerator for at least 5 minutes before using it in the dessert.
Step 2: Slicing the Banana Pudding with Vanilla Wafers Recipe
Properly Slicing Bananas for Uniform Layers
To create a visually appealing and evenly layered banana pudding, proper slicing is key:
- Select Ripe Bananas: Choose bananas that are ripe but firm, with minimal brown spots. These offer sweetness without becoming mushy.
- Slice Evenly: Use a sharp knife to slice the bananas into 1/4-inch thick rounds. Consistent thickness ensures even layers and makes each bite uniform.
- Quantity: Depending on the size of your baking dish or trifle bowl, you’ll need 3–5 bananas for a standard recipe.
Tips for Preventing Bananas from Browning
Bananas can quickly oxidize and turn brown when exposed to air. Use these tips to keep them looking fresh:
- Acidic Coating: Lightly brush or toss the banana slices with lemon or lime juice. The acidity slows down the browning process without altering the flavor significantly. Orange juice is a milder alternative if you’re concerned about tanginess.
- Layer Quickly: Minimize the time the banana slices are exposed to air by slicing them just before assembling the dessert.
- Cover Completely: Ensure that each banana layer is fully covered with pudding during assembly. This acts as a barrier, preventing air exposure and keeping the bananas fresh.
Preparing the Layers
Once your bananas are sliced and ready:
- Start with Pudding: Spread a thin layer of pudding on the bottom of the dish to create a base.
- Add Wafers: Arrange a layer of vanilla wafers over the pudding, slightly overlapping them for full coverage.
- Layer Bananas: Place banana slices evenly on top of the wafers.
- Repeat: Continue layering pudding, wafers, and bananas until all ingredients are used, ending with a layer of pudding on top.
- Decorate: For the finishing touch, add crushed or whole vanilla wafers, banana slices, or dollops of whipped cream to the top layer.
Step 3: Layering the Dessert
Assembling Layers of Wafers, Bananas, and Pudding
The magic of banana pudding lies in its beautiful and flavorful layers. Follow these steps to assemble it perfectly:
- Base Layer: Spread a thin, even layer of pudding at the bottom of your dish to create a foundation.
- Wafers: Arrange vanilla wafers on top of the pudding. Overlap them slightly to ensure complete coverage.
- Bananas: Add a single layer of evenly sliced bananas over the wafers. Ensure the slices are uniform for an even texture.
- Repeat Layers: Continue layering pudding, wafers, and bananas in the same order until all ingredients are used. Aim for at least two to three layers for a classic presentation.
- Top Layer: Finish with a thick layer of pudding to cover the bananas and wafers completely, sealing in the flavors and moisture.
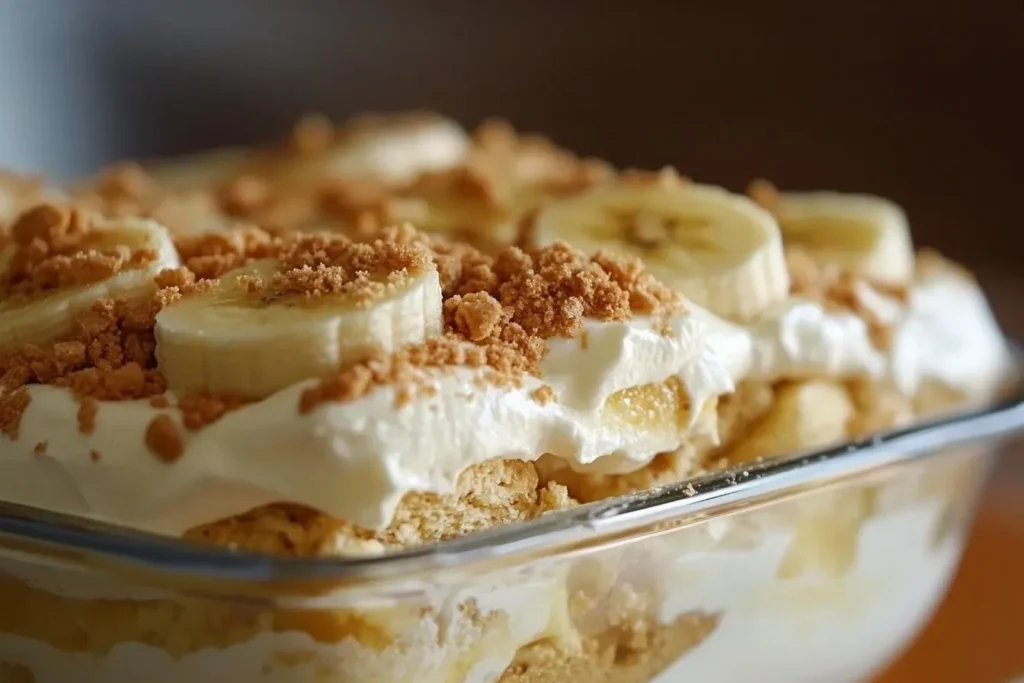
How to Create a Visually Appealing Presentation
- Trifle Bowls: Use a clear trifle bowl or individual glasses to showcase the dessert’s beautiful layers.
- Decorative Topping: Crumble a few vanilla wafers or arrange whole ones neatly on top. Add banana slices or piped whipped cream for a polished finish.
- Neat Edges: Use a small spatula to smooth the top pudding layer for a clean and elegant look.
Step 4: Chilling the Pudding
How Long to Chill for the Best Flavor and Texture
Chilling the dessert is essential for allowing the layers to meld and the wafers to soften:
- Minimum Time: Chill the pudding for at least 2 hours to achieve a cohesive texture and flavor.
- Overnight: For the best results, refrigerate the pudding overnight. This gives the wafers time to soften fully and enhances the overall flavor.
Covering the Dish to Prevent Drying
- Plastic Wrap: Cover the dish tightly with plastic wrap. Ensure the wrap touches the surface of the pudding to prevent a skin from forming.
- Lid: If your dish has a lid, use it for an airtight seal. This helps retain moisture and keeps the pudding fresh.
Step 5: Garnishing and Serving
Whipped Cream, Crushed Wafers, and Other Topping Ideas
The final garnishes add both flavor and aesthetic appeal to your banana pudding. Here are some ideas:
- Whipped Cream: Use store-bought whipped topping or freshly whipped cream for a light, fluffy finish. Pipe or dollop it on top of the pudding for a decorative touch.
- Crushed Wafers: Sprinkle crushed vanilla wafers over the surface for a crunchy texture and nostalgic look.
- Whole Wafers: Arrange whole vanilla wafers neatly around the edges or in a decorative pattern on top.
- Banana Slices: Add a few fresh banana slices as garnish just before serving to maintain their color.
- Other Toppings: Experiment with caramel drizzle, chocolate shavings, or a sprinkle of cinnamon for an extra layer of flavor and flair.
Tips for Serving Portions
- Family-Style: Use a large serving spoon to scoop generous portions into bowls or onto plates.
- Individual Servings: Prepare the pudding in single-serve glasses or jars for a neat, elegant presentation.
- Timing: Serve chilled but not icy cold. Let the pudding sit at room temperature for about 10 minutes before serving to enhance its flavors.
Variations of Banana Pudding with Vanilla Wafers Recipe
No-Bake Version of Banana Pudding
For a quick and easy dessert, skip the cooking process entirely:
- Instant Pudding: Use an instant pudding mix prepared with cold milk.
- Assembly: Layer with bananas and vanilla wafers as usual.
- Chill: Refrigerate for 2–4 hours to allow the flavors to meld and the wafers to soften.
Adding Flavors Like Caramel or Chocolate
Elevate the classic recipe with additional flavors:
- Caramel: Drizzle caramel sauce between layers or on top of the pudding for a rich, buttery sweetness.
- Chocolate: Add a layer of chocolate pudding or chocolate ganache for a decadent twist. Chocolate shavings or mini chocolate chips also make excellent garnishes.
- Peanut Butter: Swirl peanut butter into the pudding or add a thin layer between the bananas and wafers for a creamy, nutty flavor.
Making a Healthier or Low-Sugar Version
- Pudding: Use sugar-free or low-sugar pudding mix, or make a homemade pudding with a sugar substitute like stevia or erythritol.
- Wafers: Opt for low-sugar or whole-grain vanilla wafers.
- Bananas: Choose naturally sweet bananas, reducing the need for added sugar.
- Whipped Cream: Use a light or sugar-free whipped topping to cut down on calories.
Common Mistakes to Avoid
Overripe or Underripe Bananas
- Overripe Bananas: While overripe bananas are sweet, they tend to become mushy and can overpower the dessert with their strong flavor.
Tip: Choose bananas with yellow skin and a few brown speckles for the best texture and balanced sweetness. - Underripe Bananas: Green or underripe bananas are firm but lack sweetness and can taste bitter.
Tip: Allow bananas to ripen at room temperature before use.
Soggy Vanilla Wafers: How to Prevent It
- Issue: Wafers can become overly soggy if they are exposed to too much moisture or if the dessert is assembled far in advance.
Tips:- Layer the pudding carefully, ensuring an even amount over the wafers to allow softening without turning mushy.
- Assemble the dessert a few hours before serving to let the wafers absorb just enough moisture.
Over-Mixing the Pudding Base
- Issue: Over-mixing, especially with instant pudding, can lead to a runny or broken texture.
Tip: Mix pudding only until smooth and thickened. For homemade pudding, stir consistently while cooking but stop once the pudding thickens to avoid overcooking.
Nutritional Information and Serving Suggestions
Approximate Calories and Nutritional Breakdown
While the nutritional content varies based on ingredients and portion sizes, here’s an estimate for a classic banana pudding recipe (per serving, based on 8 servings):
- Calories: ~300–400
- Fat: 10–15g
- Carbohydrates: 50–60g
- Protein: 4–6g
- Sugar: 30–40g
Tips: Use light or sugar-free options for a lower-calorie version.
Pairing Banana Pudding with Other Desserts or Drinks
- Desserts: Pair banana pudding with lighter desserts like fruit salad, lemon bars, or shortbread cookies to balance the richness.
- Drinks: Complement the flavors with beverages such as sweet iced tea, coffee, or a vanilla milkshake for a nostalgic pairing. For adult gatherings, a dessert wine like Moscato works well.
Portion Sizes for Family Gatherings or Events
- Family Gatherings: Plan for about 1/2 to 3/4 cup per person. A standard recipe serves about 8 people generously.
- Events: For large groups, consider doubling or tripling the recipe. Use individual cups or jars for convenient serving and portion control.
Frequently Asked Questions About Banana Pudding with Vanilla Wafers Recipe
How Long Does Banana Pudding Last in the Fridge?
Banana pudding typically lasts 2–3 days in the refrigerator when stored properly. Over time, the bananas may brown, and the wafers can become overly soggy, so it’s best enjoyed within the first 24–48 hours.
Can You Make Banana Pudding in Advance?
Yes! Banana pudding is an excellent make-ahead dessert. Prepare and assemble the pudding up to a day in advance, allowing the flavors to meld and the wafers to soften just right. For the freshest presentation, consider adding garnishes like whipped cream and banana slices just before serving.
What is the Best Way to Store Leftovers?
- Cover the pudding tightly with plastic wrap, ensuring it touches the pudding’s surface to prevent a skin from forming.
- Alternatively, store leftovers in an airtight container.
- Refrigerate promptly and consume within 2–3 days for the best taste and texture.
Can I Use Other Cookies Instead of Vanilla Wafers?
Absolutely! While vanilla wafers are traditional, you can substitute other cookies to customize the flavor:
- Graham Crackers: Offer a subtle honeyed flavor.
- Shortbread Cookies: Add a buttery richness.
- Gingersnaps: Provide a spicy kick, especially for holiday versions.
- Biscoff Cookies: Create a caramelized, spiced twist.
How Do I Prevent the Bananas from Turning Brown?
To keep bananas looking fresh:
- Brush or toss banana slices with lemon, lime, or orange juice.
- Fully cover each banana layer with pudding to block air exposure.
- Slice bananas just before layering to minimize their time exposed to air.
Can Banana Pudding Be Frozen?
Freezing banana pudding is not recommended, as the texture of the bananas and wafers can change significantly upon thawing, becoming mushy and less appetizing. For best results, enjoy banana pudding fresh or refrigerated.
Tips for Elevating Your Banana Pudding Recipe
- Adding a Layer of Caramel or Toffee: Drizzle caramel or sprinkle crushed toffee bits between layers for a decadent twist. A caramel drizzle on top can also enhance presentation and flavor.
- Using Banana-Flavored Pudding for Extra Richness: Swap vanilla pudding for banana-flavored pudding to amplify the banana taste, creating a more cohesive flavor profile.
- Experimenting with Different Toppings:
- Nuts: Toasted pecans, walnuts, or almonds add a satisfying crunch.
- Shaved Chocolate: Dark, milk, or white chocolate shavings offer a luxurious touch.
- Crumbled Cookies: Incorporate crushed Oreos or chocolate chip cookies for added texture and variety.
- Coconut Flakes: Toasted coconut pairs beautifully with the tropical notes of banana.
Read More:
- Recipe for Banana Pudding Kids Can Make – A fun and easy option for children to get involved in making banana pudding.
- Banana Bread Recipe – A great way to use up ripe bananas for another classic dessert.
- Bisquick Banana Nut Bread Recipe – A simple and quick banana bread alternative.
- Banana Bread with Applesauce – A healthier twist on banana-based desserts.
- Chrissy Teigen’s Banana Bread Recipe – A celebrity-inspired take on banana bread for those looking to try something different.
- Banana Bread Recipe Using Oil – Perfect for those who prefer a moist texture without butter.
- Banana Bread Recipe Without Baking Soda – A useful option for those who don’t have baking soda on hand.
Conclusion
Banana pudding with vanilla wafers is a timeless dessert that perfectly combines simplicity, nostalgia, and universal appeal. Its creamy pudding, sweet bananas, and soft vanilla wafers create a symphony of textures and flavors that evoke cherished memories of family gatherings and cozy evenings. Whether you stick to the classic recipe or add your own creative twists, this dessert is as versatile as it is delightful.
The beauty of banana pudding lies in its accessibility—it doesn’t require advanced cooking skills or fancy equipment, just a handful of ingredients and a little love. Whether you prepare it for a casual dinner or a festive celebration, it’s sure to bring smiles and a sense of comfort to everyone who tastes it.
So gather your bananas, wafers, and pudding, and give this recipe a try. Let your creativity shine with garnishes, variations, and personal touches that make it uniquely yours. With banana pudding, every spoonful is a taste of joy and tradition, ready to be shared and savored.